This page describes the advanced version of the cellpose detector in TrackMate, documented here. These two detectors rely both on the cellpose software, but this one offers more configuration options that are hidden in the non-advanced version.
If you use the cellpose TrackMate module for your research, please also cite the cellpose paper:
doi:10.1038/s41592-020-01018-x
Installation
Please see the instructions in the TrackMate-Cellpose documentation page. In particular the Installing cellpose paragraph in the Additional information section.
Usage
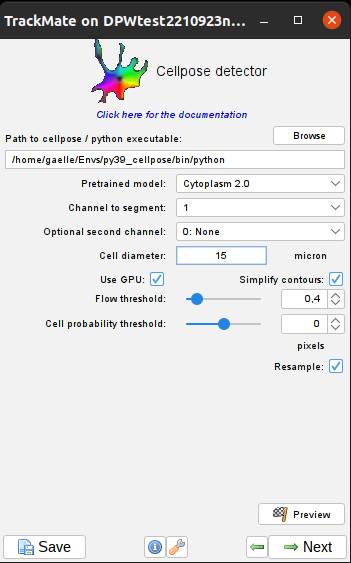
Advanced cellpose parameters in the TrackMate UI
We describe here the advanced parameters that are specific to the advanced detector. Core parameters are described in the TrackMate-Cellpose documentation page.
Cell probability threshold
One of the neural network output of cellpose is a cell probability map: each pixel contains the value of its probability to belongs to a cell.
This parameter controls the amount of confidence to keep a pixel in the cell: all pixels with a probability above cell_probability_threshold will be kept.
This value can range from -6.0 (more and larger cells) to 6.0 (less and smaller but most likely cells).
By default in the non-advanced option, this parameter is 0.0.
Flow threshold
Cellpose performs an additional step after a first reconstruction of the shape to check the consistency between the calculated cell shapes and the computed flows.
This step estimates the mean squared flow errors based on the cell shapes.
Only flows below the flow threshold parameter will be kept.
This value should be positive. If it’s small, less cells will be kept and with more regular shapes, larger values will give more cells but potentially more ill-shaped.
If it’s 0, this step will not be performed (all detections whatever the shape will be kept).
By default in the non-advanced option, this parameter is 0.4.
Resample
Cellpose resizes your image to have the mean cell size (mean diameter parameter above) equals to the mean diameter of the trained model.
The flows are computed on these rescaled images.
However, the reconstruction of the masks (the cells) can be done either at the same rescaled resolution (resample=False), or at the original image size (resample=True).
It will affect the smoothness of the resulting segmentation and the computing time:
- If your mean diameter > model diameter, the image is downscaled. In this case, resampling will create smoother ROIs but will be slower (the calculation will be done in the original image size, so on larger image).
- If your mean diameter < model diameter, the image is upscaled. In this case, resampling will be faster (running on smaller image), but will find less detections than without resampling.
By default in the non-advanced option, this parameter is set to True.
Parameters for 3D stacks
Starting from version 8, TrackMate can also handle 3D stack with cellpose. Cellpose offers two version of “3D” segmentation:
-
2D+Zstitching: cells are segmented in 2D in each z-slice then the 3D volume is reconstructed by merging together segmented cells that overlap enough between neighboring slices. -
3D mode: CellPose 3D segmentation consists in running the (x,y), (y,z) and (x,z) plans through the 2D neural networks and then reconstruction the 3D volumes.
In both cases, the deep learning part of CellPose segmentation is done in 2D. 2D slices are runned through the neural networks to compute the flows and get the segmentation. Thus any of the CellPose models can be used for 3D segmentation and (re)training of new models can be done with 2D annotations.
The parameters available in TrackMate-Cellpose are documented above.
Below we document the additional parameters that are available when the images are 3D.
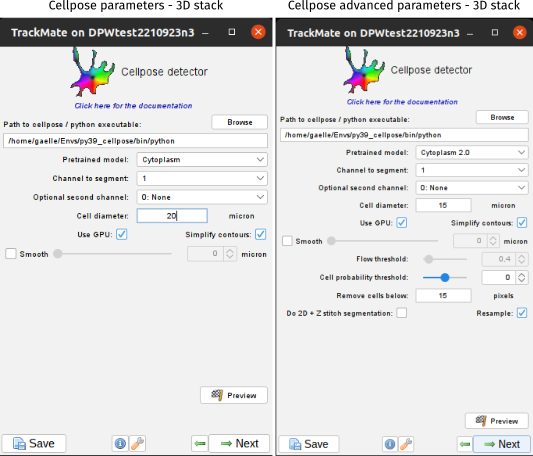
By default, TrackMate uses the 3D mode in the non-advanced version. You can change it through the Advanced Cellpose detector interface.
Remove cells below
Keep only masks that have a minimum volume, in pixels. This parameter is used only in the 3D mode of cellpose and corresponds to the min_size parameter of cellpose. In this mode, the flow threshold is not used, so this parameter allows to limit false positives by eliminating very small segmentations. ⚠️ Note that this parameter doesn’t take into account the anisotropy of the stack (the filtering is applied on the original image size).
By default, this value is set to 15 in the non-advanced version.
Do 2D+Z
This allows to choose to run the 3D segmentation with the 2D+Z Cellpose mode.
Each z-slice is runned through Cellpose and cells are segmented, similar to the 2D segmentation (see above). The same parameters (model, diameter, flow, cell probability..) are used.
Then Cellpose performs a step of 3D reconstruction that merge together 2D masks from consecutive slices if the objects overlap enough.
If this parameter is not checked, then the segmentation is done with Cellpose 3D mode.
The stack is decomposed in 2D slices in the xy, yz and xz directions. Each slice is runned through the 2D network to compute the flows.
The 3D masks of the cells are then reconstructed by merging together the calculated flows.
In this mode, the flow_threshold parameter is not used anymore as it is ignored in cellpose.
IoU_threshold
When the Cellpose mode is 2D+Z stitching, this parameter called stitch_threshold in Cellpose fixes the minimum overlap necessary to merge two segmented cells from consecutive z-slices.
For the two segmented objects in two consecutives z-slices, the intersection over union (IOU) is calculated and if the IOU is above the IoU threshold, the two objects will be marked as part of the same cell.
Smooth
Performs a smoothing of the 3D detection to obtain more regular segmentations.
In the 3D mode, the flow_threshold parameter is indeed not used so we can obtain quite irregular shapes.
You can also choose to disable this option and use the smoothing option later (see example in the tutorial below).
Anisotropy of 3D images in TrackMate-Cellpose
3D images are often non isotropic (the resolution in x, y is usually smaller than the resolution in z). To handle this anisotropy, cellpose resizes the stack to have isotropic voxels (same resolution in all dimensions).
TrackMate automatically calculates the anisotropy as the ratio between the scale in z by the scale in x,y that are read from the scaling information in the metadata of the image. This calculated value is then used for the anisotropy parameter of cellpose.
⚠️ If your image properties are not correctly set, the anisotropy will not be correctly corrected for!
Tutorial
Detect and track cells in 3D from membrane staining
This tutorial guides you through the detection and tracking of cells in 3D using cellpose (version 2.0) and TrackMate (version 8). The dataset used in this tutorial was shared with us by Paul Palmquist-Gomes in Sigolène Meilhac’s team (Institut Imagine/Institut Pasteur). The movie contains 14 time frames, 86 z planes and is of 1024*1024 pixels. Around 600 cells (spots) are to be detected at each time frame.
Setting cellpose parameters for detection
Open the movie to process.
Start TrackMate by going to Plugins › Tracking › TrackMate.
If your movie is large or contains a lot of time frames, we advise you to set-up all the detection and tracking parameters on a cropped movie (both spatially and temporally) and to apply it only after on the full movie. For this, when the first panel of TrackMate opens, you can draw a rectangular ROI to select the area to process. Click on Refresh ROI to apply your selection, the X and Y values should update. You can also set the T parameters: first time point to last time point to crop the movie temporally for the parameter tunning.
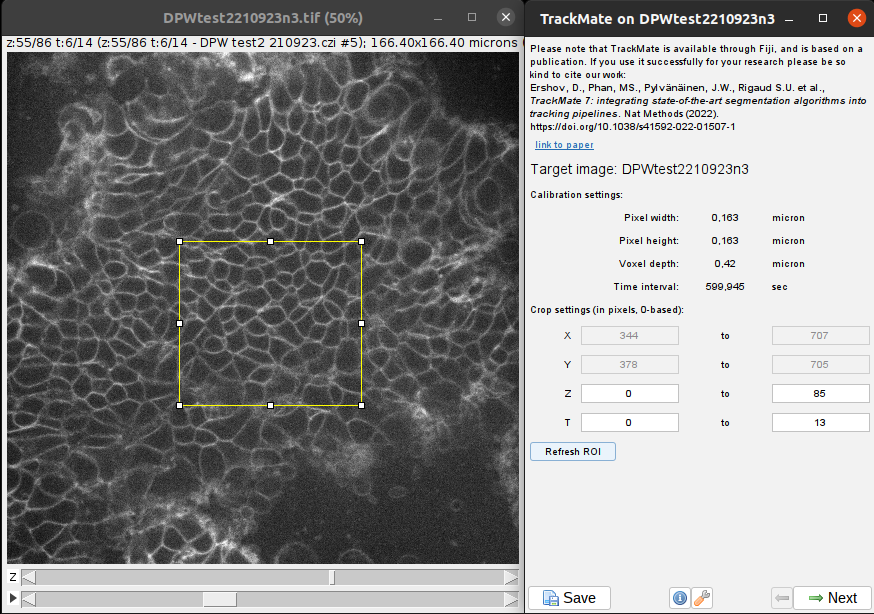
Click on Next to choose the detector and select Cellpose advanced detector.
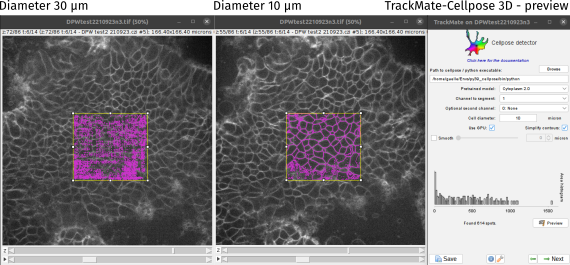
Choose the path to your python environment where cellpose is installed.
In our movie, we have only one channel, with the staining of cell membrane.
To detect cells in it, we can use the Cytoplasm 2.0 model of cellpose which gives very good results on that kind of movie.
There is only one channel so the parameter Channel to segment will be directly set to 1.
We don’t have the nuclei staining, so we keep the Optional second channel to 0 (None).
The Cell diameter parameter has a strong effect on the result and the computing time (the images will be rescaled to the trained model scale). Put the average cell diameter in micron and click on Preview to test it on the current time frame only.
Change its value if necessary until you get accceptable detections. If you don’t succeed to get a proper segmentation, you can select another pretrained model, try to do the segmentation in the 2D+Z mode or retrain a model in cellpose 2.0 on your dataset.
Once the detection parameters give good results on your previews, click Next to run the detection on the frames that you selected in the first panel (or on all the movie if you didn’t changed the T parameter). You reach the Initial thresholding panel in which you can remove false positive detections based on the spots quality measure.
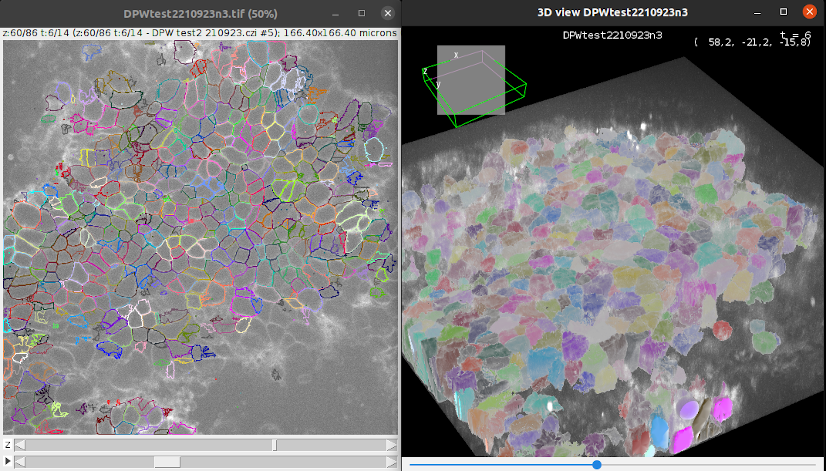
Click Next to compute all the spots statistics. You can see the final detections on the movie in the ROI if you made one, and in the selected time frames.
If you click on the 🔧 icon at he bottom of TrackMate interface, you get to the panel to set-up the display parameters. Set Color spots by to Random color to see each detection with a different color.
3D view of detections
At any step of the process, you can visualize your movie and your detections in a 3D viewer since version 8 of TrackMate.
If you click on the 🔧 icon at he bottom of TrackMate interface, you get to the panel to set-up the display parameters.
Click on 3D view to open the 3D viewer interface. In this interface, you can see in 3D your movie overlayed with your detections. The color display of the detection are synchronized between the 2D and the 3D viewer.
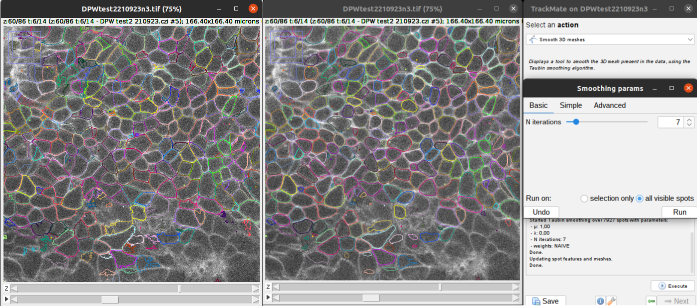
Smoothing the results
As Cellpose in 3D mode doesn’t use the flow threshold, the detections can be quite irregular. In addition to the smooth parameter in the Cellpose detector panel, TrackMate offers also a smoothing option after the computation. Go to the last panel Select an action of TrackMate and select Smooth 3D meshes.
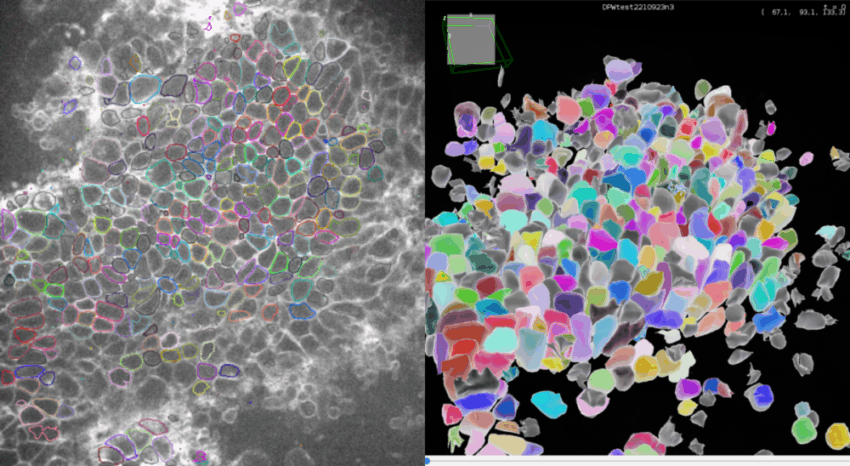
You can then use it to obtain smoother contours as in the image below (left image is without smoothing, right image is with a basic smoothing with 7 iterations).
You can undo the smoothing if the results are not satisfying and try another number of iterations or another algorithm.
Note that Cellpose with 2D+Z mode will directly gives much smoother detections as it is using the flow threshold parameter in the segmentation.
Tracking cells
Click on Next to proceed to the tracking step.
The tracking step is similar than for 2D stacks.
Here, you can choose the Overlap Tracker with an IOU of 0.25 to obtain an acceptable result.
When all the parameters have been chosen, go back to the first panel of TrackMate, remove the rectangular ROI and click on refresh ROI. This will reset all the parameters to take the full movie in the analysis. You can then perform all the steps with the full movie. All parameters should be set to the latest configuration so you should only have to click on Next for each step. The computation of the detection can take some time as it will run a 3D Cellpose segmentation for each frame.