The content of this page has not been vetted since shifting away from MediaWiki. If you’d like to help, check out the how to help guide!
This article explains how to install, configure and use Eclipse to develop ImageJ2 components and plugins. Directions correspond to Eclipse 4.4 Luna, and may need adjustment for other versions.
Initial setup
Install the Java Development Kit
- To be safe, since you may need JavaFX (for the GUI) download Java8 JDK with FX from Azul. Make sure to scroll down and choose the appropriate Operating System (Windows, Linux, etc) and Architecture (x86 64 bit for most systems, though older systems may be 32 bit). Pay attention to where you install this, as you will need to find it again within Eclipse!
- Alternatively, download and install OpenJDK.
Install and configure Eclipse
Install Eclipse
- Download “Eclipse IDE for Java Developers” from the Eclipse website.
It is important to choose “Eclipse IDE for Java Developers” because it contains Maven support built-in. Otherwise, you will have to install the M2E plugin manually.
- Unpack the archive to a location of your choice.
Configure Eclipse for your platform
![]()
Avoid permissions issues. We recommend installing Eclipse outside of the Program Files directory. E.g.: C:\Users\frood\Programs\eclipse, where C:\Users\frood is your user directory.
Configure Eclipse. After installing Eclipse, you will need to configure it to know about your JDK.
Use Wordpad to edit the eclipse.ini file in your Eclipse installation (e.g., C:\Users\frood\Programs\eclipse). (Do not use Notepad, because it will not handle the Unix-style line breaks properly.) Carefully follow these instructions to specify the proper JDK. Then save the file and quit Wordpad.
Now update Eclipse’s JRE to be JDK-aware:
- Launch Eclipse
- From the menu choose Window › Preferences
- Select Java › Installed JREs
- Click Search…, navigate to your JDK installation folder (e.g.,
C:\Program Files\Java\jdk1.8.0_11) and click OK - Check the box next to the JRE that appears and click OK
![]()
Understand Java 6 vs. Java 8. Eclipse should work on macOS with no further configuration. However, we recommend reading the macOS section of the FAQ, as there are several Java-related issues on macOS.
![]()
Avoid permissions issues. We recommend installing to $HOME/eclipse.
Do not use a package manager. For several reasons, we do not recommend installing Eclipse from a package manager. You may not get a new enough version of Eclipse (we recommend 4.3+), you will not get the Java Developers version that includes the M2E plugins, and you will likely have trouble installing additional plugins due to the permissions issues with the system-wide installation.
Adjust the Eclipse font size. Sometimes it is desirable to change the Eclipse font size. To do so, create a GTK configuration file (e.g. ~/.gtkrc-eclipse) and place the following lines there:
style "eclipse" {
    font_name = "Sans Condensed 8"
}
class "GtkWidget" style "eclipse"
Then run eclipse using this command: GTK2_RC_FILES=~/.gtkrc-eclipse eclipse
Clone the source code
Using your Git client of choice, clone the source code which interests you:
- If you want to work on an existing project, see the list of sources.
- If you are creating your own project, see the building a pom guide.
Import the source code
- Choose File › Import from the Eclipse menu
- Select “Existing Maven Projects” and click Next
- Browse to the folder where you cloned the project source code
- Click Finish
Eclipse will import and automatically build the project(s). There should not be any build errors, but it is normal to see a large number (often hundreds) of warnings. These mostly come from Java-1.4-style code or unnecessary imports, variables or methods in the sources of authors who do not use an IDE and thus have no automatic assistance at cleaning up. All these warnings can be ignored, having no effect on the functionality of the code.
If you’re having trouble, how to import and build your Maven + Eclipse project, follow this video: How To Setup and Make a Fiji Plugin
Keyboard shortcuts
| Navigation | |
| ⌃ Ctrl / ⌘ ⌃ Ctrl on a PC ⌘ command on a Mac + ⇧ Shift + T | Open a Java class from the workspace |
| ⌃ Ctrl / ⌘ ⌃ Ctrl on a PC ⌘ command on a Mac + ⇧ Shift + R | Open a file from the workspace |
| F3 |
Jump to selected class (to edit the code, see snapshot coupling) |
| ⌃ Ctrl / ⌘ ⌃ Ctrl on a PC ⌘ command on a Mac + O | Show superclass/subclass hierarchy |
| ⌃ Ctrl / ⌘ ⌃ Ctrl on a PC ⌘ command on a Mac + T | Show implementations of interface or class |
| ⌃ Ctrl / ⌘ ⌃ Ctrl on a PC ⌘ command on a Mac + L | Go to line number |
| ⌃ Ctrl / ⌘ ⌃ Ctrl on a PC ⌘ command on a Mac + Q | Go to last edit location |
| ⌃ Ctrl / ⌘ ⌃ Ctrl on a PC ⌘ command on a Mac + E | Go to next file in editor |
| Editing | |
| ⌥ Alt + ↑ Up, ⌥ Alt + ↓ Down | Move current line up or down |
| ⌃ Ctrl / ⌘ ⌃ Ctrl on a PC ⌘ command on a Mac + D | Delete the current line |
| ⌃ Ctrl / ⌘ ⌃ Ctrl on a PC ⌘ command on a Mac + / | Comment/uncomment the selected line(s) |
| ⌃ Ctrl / ⌘ ⌃ Ctrl on a PC ⌘ command on a Mac + 1 | Quick fix selected error |
| ⌃ Ctrl / ⌘ ⌃ Ctrl on a PC ⌘ command on a Mac + ␣ Space | Auto-complete current selection |
| Code cleanup | |
| ⌃ Ctrl / ⌘ ⌃ Ctrl on a PC ⌘ command on a Mac + ⇧ Shift + O | Organize imports |
| ⌃ Ctrl / ⌘ ⌃ Ctrl on a PC ⌘ command on a Mac + ⇧ Shift + F |
Format code (BUT make sure you set the coding style) |
| ⌥ Alt + ⇧ Shift + S, U | Clean up (does format and much more) |
| ⌥ Alt + ⇧ Shift + R | Refactor/rename selected class/variable |
| Debugging | |
| ⌃ Ctrl / ⌘ ⌃ Ctrl on a PC ⌘ command on a Mac + ⇧ Shift + B | Set/Remove breakpoint |
| F5 | Step into |
| F6 | Step over |
| F7 | Step out |
The Run-Debug cycle
Now that you have the project successfully nestled within Eclipse, you can run it, change the code, and run it again, iterating as needed to develop features and fix bugs. This process is known as the run-debug cycle—although some people call it compile-debug or edit-compile-debug or edit-compile-run or debug-edit-compile or edit-build-test-debug or edit-compile-link-debug or…
Launch ImageJ2
If you cloned the imagej2 project, you can launch the program as follows:
- In the Package Explorer, expand the
imagej2project - Navigate into
src/main/java - Navigate into
net.imagej - Right-click on
Main.java - Choose “Run As” and then “Java Application”
Other projects will have different main classes, but the general procedure is the same.
Testing your plugin in an existing installation
When you run your plugin from Eclipse, you’re only testing with the classpath of this project—which may or may not reflect the environment of an actual user’s installation. To test your plugin in an existing installation you can either simply copy the jar, or use Maven to install your plugin and its dependencies.
 Setting up a new Maven Build configuration
Option 1: Copying the jar
All modern Eclipse installations have the m2e plugin, so you can simply tell
Maven to
build the project.
This creates a .jar in the /target subdirectory,
which you can then copy to an ImageJ2.app/jars/ directory.
This is a simple option that makes minimal changes to the existing installation.
Option 2: Install dependencies
All mavenized ImageJ projects have built-in support for installing directly into an existing installation, overwriting previous versions of any components, and pulling in up-to-date versions of any dependencies. This is the most robust way to test your plugin, but note that it may make additional changes to your existing ImageJ installation.
Steps are as follows:
-
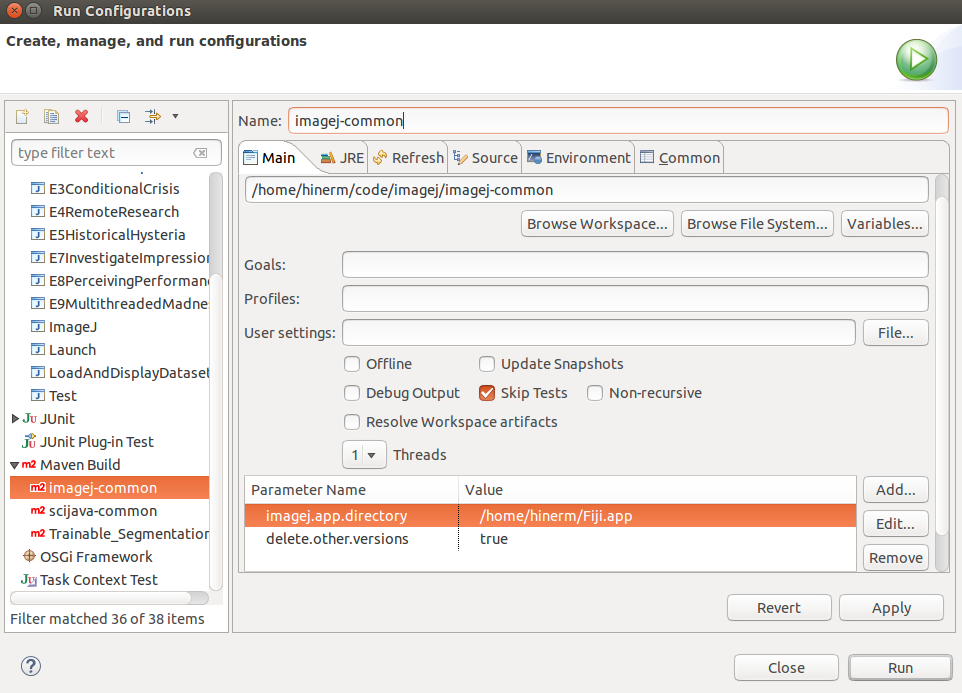
Right-click your project in Eclipse and select Run As › Run Configurations…
-
Scroll down to Maven Build. If you’ve built this project with Maven via Eclipse before there will already be a configuration for it. Otherwise you can double-click “Maven Build” to create a new run configuration.
-
Add a parameter:
scijava.app.directorywith value:<path/to/ImageJ2.app>(e.g./home/hinerm/Fiji.app) -
Add a parameter:
scijava.deleteOtherVersionswith value:always -
Click
Apply
You can now run the project from this dialog. You only need to perform this configuration once though—future uses of the Maven Build option will automatically copy your plugin and its dependencies to the specified ImageJ app.
Adding new plugins
The easiest method is to start with a
minimal project, renamed to
the desired name of your plugin. By convention, the project directory should
match the base name of the .jar file to be generated.
The format of such a pom.xml is described briefly on the
Maven page.
Most importantly, you will need to adjust the artifactId and the
dependencies section. Should you require a dependency that is not used in
Fiji yet, you might want to search for the appropriate groupId and version
in the SciJava Maven repository.
Next, you will put your Java sources into src/main/java/
and adjust src/main/resources/plugins.config.
After that, ask Eclipse to import it: File › Import › Maven › Import Existing Maven Project.
Viewing Dependency Source
When jumping into a dependency class in Eclipse (using F3), you may see a message stating “Source not found”.
For Maven dependencies there must be a -sources classifier JAR in the
repository along side the main JAR. For example, imagej-common has an
imagej-common-0.24.4.jar and an imagej-common-0.24.4-sources.jar. In
theory, the Eclipse M2E plugin should download this -sources JAR and
automatically display it to you when you jump to the class.
However, if for some reason this doesn’t happen you can try the following steps.
-
Try right-clicking the JAR in the Maven dependencies in Eclipse, and selecting “Download Sources”. This should force Eclipse to download the
-sourcesJAR. - Check that the
-sourcesJAR has been downloaded locally.- Navigate to
<path-to-.m2-repo>/repository/<groupId>/<artifactId>/<version>and see if there is a-sourcesJAR there. - If it is not, then in a terminal navigate to the folder containing your
project’s pom.xml file. And then from the command line run:
mvn dependency:get -Dartifact=groupId:artifactId:version:packaging:classifier- For example if a project depended on imagej-common and you needed
to retrieve the
-sourcesJAR, the command you’d type would be:mvn dependency:get -Dartifact=net.imagej:imagej-common:0.24.4:jar:sources
- For example if a project depended on imagej-common and you needed
to retrieve the
- Navigate to
- If the
-sourcesJAR was there, you could check its contents by running the following command from the terminal:jar tr <path-to-.m2-repo>/repository/<groupId>/<artifactId>/<version>/<jar-name>-sources.jar- If the file in question isn’t there, then unfortunately this project doesn’t have source for that class.
If the class you’re trying to view is a part of the JRE and you’re on Linux,
you may need to run sudo apt install openjdk-<java-version-number>-sources
to retrieve the sources.
Note that doing this only allows you to view the source code, it does not allow you to edit it. If you need to edit these files, see the snapshot coupling section for more information.
See also
- Developing plugins for ImageJ2
- Developing plugins for ImageJ 1.x
- Contributing to a plugin
- example-imagej-command (ImageJ2-style command)
- example-legacy-plugin (ImageJ 1.x-style command)